Github Multi Accounting

This guide is just a collection of steps and use case for implementing multi-account authentication on Github in your local machine.
Context
There was a time when cryptic sysadmins and developers integrated their scripts and codes underneath a pile of skull and rocks (kindly called Revision Control Systems).
Evolved offspring of this so-called jurassic figure filled the earth after this apocalyptical era, and rapidly became popular and known by their own names, like Subversion and TurtoiseSVN, the later its GUI implementation.
Things were gaining traction back then, and the fast-paced rhythm on which software was being developed, spawned a new set of demon capable of spread havoc and anxiety for generations to come. Well known as Git.
Loved and hated, different tastes contributed more or less to what is better known today as SCM - Source Control Management, creating a rich and diverse ecosystem of tools for the occultist craft of software engineering.
In my life I've only used two systems for SCM, SVN and Git. I also have seen people scratching their heads to be more productive on their work machines and keep up with their contributions besides job-related ones.
If you want to dig deeper into Git, there are many resources and also an de facto industry standard book written about what git is and how to better leverage its system's functionality. Check it out!
My main drive for this post is because there's so much information out there about vanilla git configurations, but few ones aimed to configuration and operability for productivity - aside of installing new-shiny-tools.
Here we go:
- Signing commits
- Using multiple accounts for the same username OR getting fame & glory
Signing Commits
Signing posts is the most overlooked component when you are working for a closed doors org if they enforce self-domain usage for contributors in private repos, that is: only users with email user@myorg.com are able to contribute on private repositories and no outside collaborators are allowed.
That works... in parts! Let's suppose you have started small and gaining traction month by month, not only in revenue and corporate growth, but also in collaborators among your team who constantly push changes to production.
Once you start adding complexity in your environment, and aren't inclined to spend large bucks with security software for everyone's laptops - a couple questions arise:
- Are my devs skilled enough in security practices while using their machines for off-work related issues?
- How can I be assured that the startling new shiny tools integrated in our pipelines, doesn't pose a security risk for the entire supply-chain of our product?
- What if a disgruntled employee starts to pose a security risk and plans to act on behalf of other employees to compromise our chain and our users?
- More what ifs...
With these concerns at bay, a preliminary solution is to activate signed commits.
As this post from the old is explaining, it poses a question of authenticity and integrity, because:
... the software [in question] is critical to some type of security, an attacker might compromise you by substituting broken software for the software you think you're getting, e.g. something with a backdoor you couldn't easily identify. After all, you want some code, you click "download", and you trust. - Cris from Stackoverflow Apr 26 2017
Sufficiently to say, it also puts another layer of trust in commits inside your org, validating contribution's origin for its members.
So, how do you do that?
I'll summarize the main steps below, but feel free to check this doc from Github and follow it at your own pace.
-
Install your GPG suite of tools.
-
Activate commit auto-sign after each commit, this will save time on each commit:
git config commit.gpgsign true -
Generate your key:
gpg --full-generate-key
It must be at least 4096 bits (default option) Your email must be the main email address of your Github account
- List and export your newly created GPG key:
gpg --list-secret-keys --keyid-format=long. Copy the e.g: 3AA5C34371567BD2 part to be used in the next command.
$ gpg --list-secret-keys --keyid-format=long
/Users/hubot/.gnupg/secring.gpg
------------------------------------
sec   4096R/3AA5C34371567BD2 2016-03-10 [expires: 2017-03-10]
uid                          Hubot
ssb   4096R/42B317FD4BA89E7A 2016-03-10
Now, run the below command and copy the exhibited key in your GPG settings on Github:
$ gpg --armor --export 3AA5C34371567BD2
# Prints the GPG key ID, in ASCII armor format
- Telling Github you're a winner. Inserting your keys in the config
$ git config user.signingkey 3AA5C34371567BD2
The process above can be used to generate as many keys as you want. It's useful if you plan to manage more than a single account on your machine/session, as we'll cover in the next part.
From now on, you're able to effectively prove yourself and sign every commit you make. Welcome to the age of surveillance capitalism!
Configuring Multiple Accounts
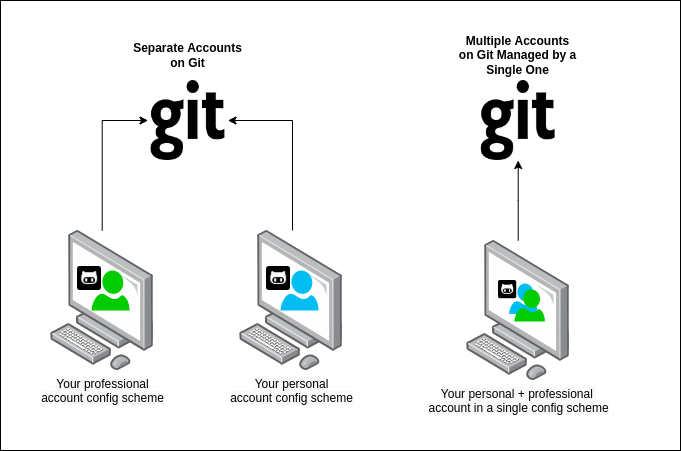
I really appreciate your taste for the above image!
There's a way to have a virtually unlimited number of git accounts configured if you observe some tricks, but often the most sought after feature is to maximize productivity, allowing you to commit to your professional and personal projects.
The above image says that in some cases, you want to use your personal username to work for your org, but using the org domain email, while, for your private projects, preserving the personal username + email address, also. But... is that possible? Yes, my horseshoe crab!
Let's do that now:
- Head back to your Github's email settings. In this case, let's create the scenario where you're using your personal account and planning to use this account's username to commit to your org.
- Simply add your org's email address and then make it valid.
- Your primary address can be either your org or your personal one
After confirming your address, let's go to your ~/.gitconfig settings in your machine.
In this step, you'll not need to configure your SSH keys for each account, as the username will not change. For possible counterpositive needs, you could check this ancient scroll.
We are going to generate and use two additional files for this case, despite the .gitconfig file, and also will specify a static working path dir, to be used with one of the accounts.
~/.git-personal.conf~/.git-professional.conf
In the .gitconfig file you'll have your path choice set and additional commands:
.gitconfig
include]
        path = ~/.git-personal.conf
[includeIf "gitdir:~/Documents/YourOrgFolder/"]
        path = ~/.git-professional.conf
[init]
        defaultBranch = main
- `.git-personal``
[user]
        signingkey = 3AA5C34371567BD2
        email = your-personal@email.com
        name = your-username
        mergeTool = vimDiff
[commit]
        gpgsign = true
.git-professional
[user]
        signingkey = FD668DAFE840A89C
        email = your-professional-email@organization.com
        name = same-username-as-your-personal-one
        mergeTool = vimDiff
[commit]
        gpgsign = true
One thing to notice in the above configuration is that you can use more than one signing key, or use the same to signed-commit in both projects - make sure your boss don't work two part-time jobs, if you'll just one key btw.
If you're taking advantage of this pandemic and working more than one all-remote job, you could negotiate to use your same username and enjoy a multi-org config. Just create more .git-professional-<number> files and more [includeIf] entries in your .gitconfig file.
Now, for cloning accordingly (Github example), for other configured accounts not in your first [Include]- which is applicable to any folder besides the configured others - you need to run the clone command this way:
$ git clone git@github.com-<account_username>:<account_username>/<repo_name>.git <repo_name>_<account_username>

$ git clone git@github.com-nullniverse:nullniverse/my_repo.git my_repo_nullniverse
That's it.